Saturday, 30 August 2014

Augmented Reality Auras with Aurasma app

Aurasma is a rather nifty little ipad app, which lets you create augmented reality experiences very quickly. You attach certain content to a trigger image, and then when you look at the trigger image through the app to see the content dynamically mapped onto it.


You can use Aurasma to do Augmented Reality body hacking!
This was a happy accident that happened very recently, and is something we will most definitely
be investigating further in the future!

The artist and cricital engineer Julian Oliver (who will again feature in Brighton Digital festival this year) has made some very interesting things with AR  in the past, including this game :

And this fantastic project, called "the Artvertiser"
(a computer encased in some retro looking goggles, which replace billboards with Art) 
We absolutely love the message of this project, and it's playful, subversive approach


Augmented Billboards 2: The Artvertiser @ Transmediale 2010 from Julian Oliver on Vimeo.


In Aurasma, you can map 2D images, 3D models, and also sound to a trigger image. The app calls these mappings "Auras" Once you have made an "Aura", you can add it to your channel. You can find and follow other people's channels, which lets you see any Auras that they have made, and can likewise share yours.


Exploring Senses have made a channel, which you can follow by either scanning our (lovely and vibrant) QR code above, or going to http://auras.ma/s/NC5Tj from any mobile device.

There are some example trigger images up on our Aurasma facebook album for you to see it for yourself, or try poking around our website, there may be a few surprises lying around....

It is relatively quick and easy to link 2D content to trigger images, but I figured it was worth looking into how to get your own custom 3D content in there. I had been researching 3D scanning a bit, and had a rudimentary understanding of 3D modelling software, so this was the perfect excuse to learn.

Autodesk Maya is the modelling software of choice if you want to make content for Aurasma, so that is what I got stuck into learning. The interface is somewhat overwhelming at first, with an absurd amount of different options available, and several different interface 'modes' that reveal whole other sections and toolbars.....


You got all that yeah?

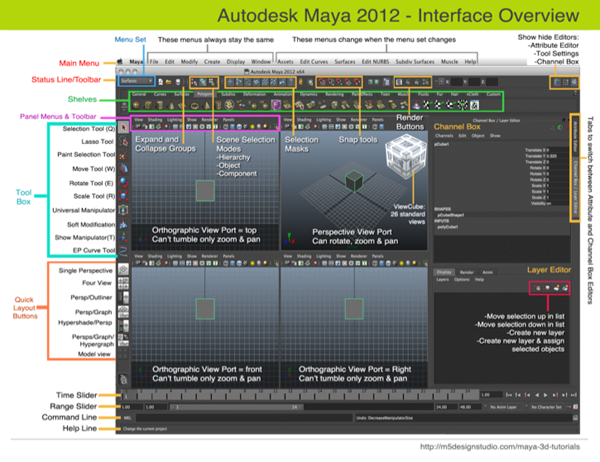
This tutorial gives a good overview of how to get a textured 3D model from Maya into Aurasma, and was very helpful, as it requires a very specific set, and format of files to work properly.


This tutorial is great, but it starts with an already made 3D model complete with textures. I wanted to also learn how to create, model, and texture things from scratch.

There are a ton of different Maya tutorials out there at lots of different levels, so I spent a while watching them and soaking up what on earth all the different bits of the interface are for, and how people use it for different tasks before diving in. Once you get your head round the basics, and understand what is possible, with a few common shortcuts, it is an incredibly powerful, quick and easy to use bit of software.

In order to share what I learned during this period of research I created my first ever video tutorial. Starting completely from scratch I go through how to :

 - Download and install a trial version of Maya
 - Create and edit 3D models
 - Add textures and map them to the faces of the models.
 - Use keyframes to add animation to the model (and "bake" these animations so Aurasma can read them)
 - Export all the files needed for Aurasma
 - Use Aurasma's dashboard to assign your model to a trigger image, and overlay it as an "Aura"


Tutorial video : 


Here is a video demonstrating some of the 2D, 3D, and animated Auras we made :


And here are some screenshots of them from Aurasma :


This robot arm is animated (as you can see in video above)

Some kind of boimechanical bird / robot arm thing. This was a result of my experiments
to try and create jointed models and rigging then for animation.


David Allistone produced this animated overlay cleverly to bring the LED matrix to life.
It also has music, which makes it more fun, and is something we will be investigating further in the future

Experimenting with minimal, abstract wireframe picture frames for the website


Slightly more polished looking picture frames

This abstract floating smurf model is definitely my favourite.

The 3D scanned smurf model above, and the animated LED matrix were the two most compelling AR experiences we created, and we will definitely be developing and researching these avenues further over the coming months.

Unfortunately, cleaning up the 3D smurf model into a suitable format was not at all easy, and took a whole lot of trial and error to get it to work nicely. (see 3D scanning and modelling blog post) Refining this workflow is a priority task for us in the future.

Once we have a decent library of 3D toy models, we would like to create a small book with images on each page that we can use as a  portable exhibition. The book would be filled with bespoke trigger images which would stand on it's their own as a pieces of art, and with the models overlayed would also be a great way to showcase creations from previous workshops (plus it would save us lugging a whole load of extra toys around!)

Unfortunately, as with a lot of our technical research, we are only just getting to the exciting bits now, as it has taken a while to become aware of, and start learning how to use the right tools for the job. In July and August though, we started to integrate these into some activities and workshops.

In July we did a series of events with Home Live Art (which incidentally came about through conversation and collaboration with mASCot at our new R&D hub in Prestamex house) We used these events as a testing ground for taking content created by children, and mapping it to images which could be printed out and attached to cardboard cretions in a Robot Relays workshop.

There are blog post on our events blog about these here (Hopscotch festival) and here (Shuffle festival)

Here are some images from the day :


Animata


Animata "is an open source real-time animation software, designed to create animations, interactive background projections for concerts, theatre and dance performances."

It is the closest thing out there to a real time version of After Effects' excellent Puppet Tool, and lets you create complex animations from 2D images. It works in much the same way, although is nowhere near as automatic. To create a puppet from a 2D image in Animata you have to manually create and rig the mesh yourself. This requires you to : 

1. Import the image you want and move/scale it to fit on the screen.
2. Draw a series of points around your model to be used as vertices for a mesh.
3. Auto-create a triangle mesh by grouping these vertices together.
4. Manually fix any errors made by the auto-triangulation
5. Add points where Joints will go
6. Create bones by connecting joints
6. Attach each bone to all the right vertices (so that the mesh moves with the bones nicely)
7. Adjust the weightings on the joints to create spring constraints
8. Move the joints around and test the meshes movement
9. Keep adjusting weightings, attachments, and skeleton structure until you get a natural looking motion

This would all be well and good, except Animata is missing a really rather crucial feature... 

AN UNDO FUNCTION!!! 

Trying to go through all these steps, where there are lots of irreversible ways to mess you model up (if you wiggle the wrong bone about by accident it can bunch up, and you have to go back to your last save) is a somewhat painful experience. You have to be extremely careful and methodical.

It took some time, but after a bit of tinkering I figured out a system that worked, and was able to create some rigged meshes for a few different toy hacks : 


A triangle mesh created for this BeaverWhale (or maybe it's a WhaleBeaver?)

And one created for this (slightly menacing) box with the arms of a baby
The baby with the skeleton in place.
In this picture, I am attaching vertices to the bone in the hand on the right
A fully rigged puppet, with the darker bones acting as springs to constrain the motion/

Once you have created these meshes, you can give the joints names, and then control them by sending them OSC messages. (OSC is a super handy messaging protocol for sending information between programs. Basically MIDI for programmers)

Now for the fun part - To manipulate them in realtime! There are a number of ways to get motion tracking data into the right format of OSC message, but my preferred tool of choice was TouchDesigner. I created a custom patch to read in information from a Leap Motion hand tracking controller, and remap it into the right ranges, and message formats to control the puppets appropriately. I designed the patch to make it extremely quick and easy to tweak the ranges and change the names of the control messages.

TouchDesigner patch to contol Animata with a Leap Motion controller

The only model I successfully got to move in a vaguely natural way

It is very much a trial and error process, but some of the results were really quite impressive, and when you get it right it is super fun to play with. Unfortunately, as it is homebrew software developed by a very small team it is just not quite stable enough to use for a serious project. It has an incredibly annoying habit of incorrectly resizing your output display to be either way too big or way too small, and there are a lot of ways to mess up your project irreversibly, forcing you to quit and reopen your last save. This is simply not workable for an installation context unfortunately, at least without heavy supervision, and frequent restarts. 

Here is a video of me destruction testing two models at once :


Arduino & Servos


Another thing that was looked at was the possibility of controlling servo motors from within the TouchDesigner graphical programming environment. I had previously looked at this some time ago and come up with a slightly hacky and complicated way to do this. During our R&D I came up with a greatly simplified and more reliable protocol for talking to the Arduino, and added a graphical control interface for controlling a servo motor from your computer :  


I then hooked it up to an existing system I had made for live looping of MIDI parameters :


Robotic CommuniToy

Scratch


MIT's Scratch programming software is a fantastic tool, and has become hugely popular over the last two years. It is now taught widely as part of key stage 1 and 2 computing in schools.

in August 2013, we collaborated with Neil Ford from  Code Club to run a pilot week of activities combining coding with Exploring Senses toy hacking, robot relays, and electronics building activities called "Code for Kids" (1.0)  blogs - (day 1, day 2, day 3 day 4, day 5)

During our R&D period, we have run two more events building on this :

In February half term, we ran a 3 day series of workshops with young people at Brighton Youth center called, yep, you guessed it.... "Code For Kids 2.0" Thanks to Sussex Community Foundation these workshops were free for all to attend. Here is a blog post documenting the project

Also, throughout June and July, we provided a series of further creative coding workshops at Brighton Youth Center's Junior Club, documented in a blog post here

My favourite game that anybody produced was this rather surreal one :


CommuniToy Animations

After Effects Puppet Tool


Creating and animating digital characters can be a pretty fiddly and involved process, and there are a ton of different ways to do it. For quickly and easily animating 2D characters, by a very long way, the best tool I have discovered is After Effects' puppet tool. It allows you to take a single flat image of a character, and manipulate it to animate in incredibly natural looking ways with a minimum amount of fiddliness.


In November 2013 Exploring Senses artist Louis d'Aboville created an interactive installation for Brighton Council's Shine on London Road project. The puppet tool was used extensively to create over 70 animations from photographs of toy hacks.

Project video :

Toy Hacking from Jeb Hardwick on Vimeo.

Needless to say after this I was reasonably familiar with this tool! Exploring Senses have used this for new activities a few times during this R&D period.

The first was in April, when we did a workshop at Lighthouse as part of the SprungDigi project, (ES blog post here) The project involved working with learning disabled creatives to create toy hacks, learn how to animate them, and put them in a bespoke version of the software used for the Shine On London Road project.

The second time we used it was in the final workshop for our ICT Art connect commission. #LINK# It was used to quickly animate on the spot toys that were being made in the workshop, and display them throughout the workshop as part of Brighton Urban Artfest, an event for Brighton Fringe festival.

It was also used to create animations for the Sensory Jumblies project #LINK#

IdentiToy

Puppeteering with Zigfu

I started off my research looking at potential technologies for puppeteering and interacting with digital versions of toy hacks in realtime, with a view to developing these into interactive exhibits.

The most promising looking solution for puppeteering, and the one we investigated first is something called ZigfuZigfu's ZDK development kit allows you to get the joint positions from a Microsoft Kinect sensor into other software, including a game engine called Unity3D. These can then be linked to the joints of a rigged 3D model, so that you get one to one puppeteering of the model's limbs. 

After much faffing around with Kinect drivers, I was able to get the example project running. I also did some research on Unity3D, and basic 3D modelling software so we could begin creating custom content to modify the project with.

I used Google sketchup to create some robot parts, and exported them as .obj files (a standard 3D model filetype) These could then be imported to Unity, positioned and linked to the existing model. I also customised the model's texture to have a CommuniToy logo, and attached some virtual lights to the model's hands.


This is really rather fun, and very entertaining to watch, although as you can see in the video, the tracking is not particularly smooth or accurate (especially when you turn to the side or turn around) The Kinect also requires you to do a "calibration pose" (stand like a cactus) before it will pick you up, and this can sometimes take a rather long time, with no feedback as to what you are doing wrong. Once you are tracked it also often loses track of your limbs. For these reasons, the technology was not really reliable enough at the time to be suitable for an installation, and we did not look into this much further.

In July 2014, Microsoft released the new version of their Kinect sensor for windows. It is massively improved in almost every way possible, and is extremely promising for developing puppeteering based interactions. Unfortunately, as with all new technologies initial support is extremely patchy, and it takes a while for it to be integrated into existing software, or for new products to be built around it. At the time of writing (August 2014) there is no support for the new Kinect in ZigfuNImateFaceshift, or any of the accessible solutions for realtime puppeteering, although this is definitely something we will be keeping a close eye on.

IdentiToy

Thursday, 28 August 2014

Leap Motion Hooks Up to Oculus for Controller-Free Virtual Reality: 28th August 2014


Great news indeed!!: )


This development is very exciting and possibly a step towards the dream multiplayer Toy Hack Disco/Rave experience, and game play within Unity environments.

We will be receiving the V2 Oculus rift soon.
Just ordered 3 x leap motion Oculus Rift mounts (2 for ES to use with our Rift DK1, and soon to arrive DK2 kit + one spare for use with future collaborators such as Blockbuilders, as the mount and cable is only €14 each: )


Arts Council

IdentiToy
CommuniToy Animations